せっかく「Ubuntu入れてRubyを学習するぞ」って思ったのに
「IDE(RubyMine)で接続できないじゃないか!」
と思ってないだろうか?
たしかに初期設定のままだとIDEからSSH接続できない。
どうすればいいか解説します。
初心者でもできますが、サーバーファイルを直接編集しますので注意してください。
- 講義でもしていますが、先にスナップショットをとってサーバーの状態をバックアップしてください。
目次
sshd_config を編集するコマンド
$ sudo vi /etc/ssh/sshd_configサーバーに入ってsshd_configファイルの編集を行います。
追加と無効化するものがありますので記述してください。
sshd_config を編集
上記コマンド後 sshd_config を編集します。
- キーボードの「Ins」または「Insert」キーを押します
そうすることで入力できるようになります。
#       $OpenBSD: sshd_config,v 1.101 2017/03/14 07:19:07 djm Exp $

# This is the sshd server system-wide configuration file.  See
# sshd_config(5) for more information.

# This sshd was compiled with PATH=/usr/bin:/bin:/usr/sbin:/sbin

# The strategy used for options in the default sshd_config shipped with
# OpenSSH is to specify options with their default value where
# possible, but leave them commented.  Uncommented options override the
# default value.

#Port 22
#AddressFamily any
#ListenAddress 0.0.0.0
#ListenAddress ::

#HostKey /etc/ssh/ssh_host_rsa_key
#HostKey /etc/ssh/ssh_host_ecdsa_key
#HostKey /etc/ssh/ssh_host_ed25519_key

# Ciphers and keying
#RekeyLimit default none

# Logging
#SyslogFacility AUTH
#LogLevel INFO

# Authentication:

#LoginGraceTime 2m
#PermitRootLogin prohibit-password
#StrictModes yes
#MaxAuthTries 6
#MaxSessions 10

#PubkeyAuthentication yes

# Expect .ssh/authorized_keys2 to be disregarded by default in future.
#AuthorizedKeysFile     .ssh/authorized_keys .ssh/authorized_keys2

#AuthorizedPrincipalsFile none

#AuthorizedKeysCommand none
#AuthorizedKeysCommandUser nobody

# For this to work you will also need host keys in /etc/ssh/ssh_known_hosts
#HostbasedAuthentication no
# Change to yes if you don't trust ~/.ssh/known_hosts for
# HostbasedAuthentication
#IgnoreUserKnownHosts no
# Don't read the user's ~/.rhosts and ~/.shosts files
#IgnoreRhosts yes

# To disable tunneled clear text passwords, change to no here!
#PasswordAuthentication no
#PermitEmptyPasswords no

# Change to yes to enable challenge-response passwords (beware issues with
# some PAM modules and threads)
ChallengeResponseAuthentication no

# Kerberos options
#KerberosAuthentication no
#KerberosOrLocalPasswd yes
#KerberosTicketCleanup yes
#KerberosGetAFSToken no

# GSSAPI options
#GSSAPIAuthentication no
#GSSAPICleanupCredentials yes
#GSSAPIStrictAcceptorCheck yes
#GSSAPIKeyExchange no

# Set this to 'yes' to enable PAM authentication, account processing,
# and session processing. If this is enabled, PAM authentication will
# be allowed through the ChallengeResponseAuthentication and
# PasswordAuthentication.  Depending on your PAM configuration,
# PAM authentication via ChallengeResponseAuthentication may bypass
# the setting of "PermitRootLogin without-password".
# If you just want the PAM account and session checks to run without
# PAM authentication, then enable this but set PasswordAuthentication
# and ChallengeResponseAuthentication to 'no'.
UsePAM yes

#AllowAgentForwarding yes
#AllowTcpForwarding yes
#GatewayPorts no
X11Forwarding yes
#X11DisplayOffset 10
#X11UseLocalhost yes
#PermitTTY yes
PrintMotd no
#PrintLastLog yes
#TCPKeepAlive yes
#UseLogin no
#PermitUserEnvironment no
#Compression delayed
#ClientAliveInterval 0
#ClientAliveCountMax 3
#UseDNS no
#PidFile /var/run/sshd.pid
#MaxStartups 10:30:100
#PermitTunnel no
#ChrootDirectory none
#VersionAddendum none

# no default banner path
#Banner none

# Allow client to pass locale environment variables
AcceptEnv LANG LC_*

# override default of no subsystems
Subsystem       sftp    /usr/lib/openssh/sftp-server

# Example of overriding settings on a per-user basis
#Match User anoncvs
#       X11Forwarding no
#       AllowTcpForwarding no
#       PermitTTY no
#       ForceCommand cvs server
UseDNS no
GSSAPIAuthentication no
上のファイルから
PasswordAuthentication no に
コメントアウトします。
#PasswordAuthentication noこのようにしてパスワード認証によるアクセスを許可します。
これでIDEからアクセスできます。
最後の行に
UseDNS no
GSSAPIAuthentication no
を入れてることでSSHでの接続速度を向上させます。
sshd_config を保存して終了します
- キーボードの「Esc」または「エスケープキー」を押す
- キーボードの「:」コロンを押す
- キーボードの「w」「q」を押す
- キーボードの「エンターキー」を押す
これで保存してファイルから出る事ができます。
sshd_config を保存したらSSHを再起動
$ sudo su -
$ systemctl restart sshd
sshd_configのファイル保存が終わったらSSHの再起動をします。
Ruby on Railsの入ったUbuntuを起動してRubyMine(IDE)で接続できるか確認


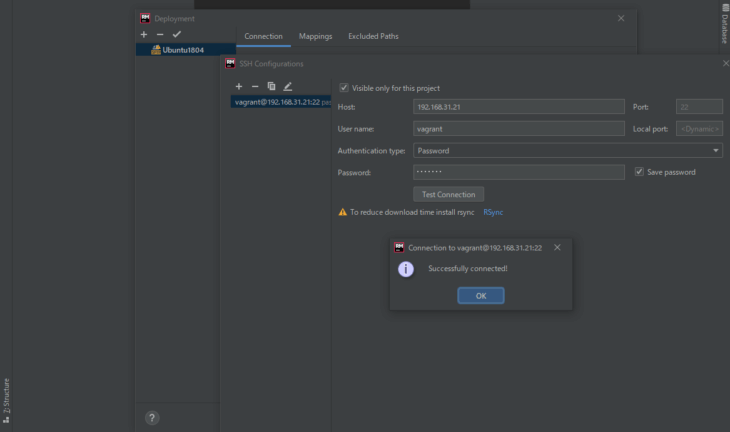
VagrantのID、PASSを入力して接続できるかテスト
このようにSuccessと出たら接続OKです。

