ワードプレスで「single.php (詳細ページ)を分ける必要がある」場合があります。
なぜシングルを分ける(分岐)させる必要があるのか?
なぜなら
用途によって single.php を使い分ける必要が出てくるから
この点を初心者にも分かりやすく解説します。
こう言った質問をくれたあなたは
- 成長意欲
- 学習意欲
の高い素晴らしい人ですね。学習を続けていきましょう!
目次
どういう時に、WordPressのsingle(シングル)を分岐させるのか?
想定例としては
1:例えば、カテゴリーBookがあったとします。
- Bookには、本の値段のカスタムフィールド
- Bookには、本の画像のカスタムフィールド
- Bookには、本のタイトルのカスタムフィールド
2:例えば、カテゴリーブログ(日記)があったとします。
- ブログ(日記)なのでカスタムフィールドなし
このとき、カテゴリーBook とカテゴリーブログ(日記)が同じsingle.phpだと何が起こるか想像できるでしょうか?
WordPressのsingle.phpの内容が違うときは分岐させる
答えは
カテゴリー ブログ(日記)と カテゴリーBook が同じだった場合は
ブログ(日記) なのに
- 本の値段のカスタムフィールド
- 本の画像のカスタムフィールド
- 本のタイトルのカスタムフィールド
これらが表示されてしまいます。
これらはブログページでは不要ですよね?なので、分岐させます。
この例は単純構造なので、
PHPの分岐で入力が無ければ非表示にする
こういう方法で single.php 1つでも対応出来ますが、業務用や依頼などの場合はもっと複雑になります。
- Aカテゴリーは店舗情報(全国の複数店舗)
- Bカテゴリーは商品情報(全商品)
- カスタム投稿を使って別の詳細ページが必要な時
こうなる場合は、 single.php を分けた方が良いですね。
わかったでしょうか?
WordPressで single.php を分ける場合の想定はこのような感じです。
では具体的にワードプレスのシングルをどのように分ければ動くのでしょうか?
WordPressの single.php をカテゴリーによって分ける方法
これは中級レベルですので、以下の手順がわからない場合はWordPressの分岐の学習を行って下さい。講義外の中級講義になります。
実際に分岐していきましょう。
いくつか方法はありますが、初心者向けと言うことで、簡単な方法で行きます。
セクション11の57から解説している「プラグイン作成編:WordPressのカスタム投稿プラグインを作成してみよう」でもプラグインとして single.php を分岐して使う方法を解説しています。
まずは、WordPressのsingle.phpを複製しましょう。
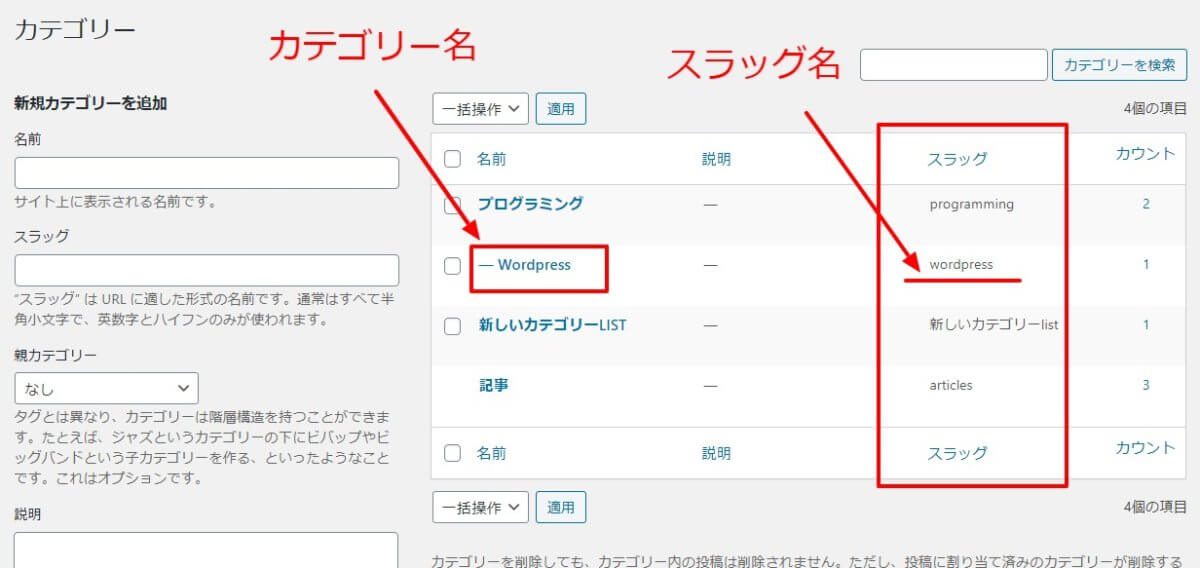
WordPressの詳細ページを複製する前にカテゴリー名とカテゴリースラッグ名を確認
カテゴリー名とスラッグ名は管理画面のカテゴリーから確認出来ます。

まずここを作成しておきましょう。
WordPressのsingle.phpを複製してカテゴリー名を付ける
<?php get_header(); ?>
<div id="single" class="container my-5">
    <div class="row">
        <div class="col-md-8 mb-4 articleMain" itemscope="itemscope" itemtype="http://schema.org/BlogPosting"
             itemprop="blogPost">
            <div class="singleLeft" itemprop="articleBody">
                <?php if (have_posts()) : while (have_posts()) : the_post(); ?>
                    <div class="text-right smallEX">
                        <i class="fa fa-calendar"></i>[掲載日]
                        <time itemprop="datePublished" datetime="<?php the_time('Y-m-d') ?>"><?php the_time('Y/m/d') ?></time>
                        (更新日<time itemprop="dateModified" datetime="<?php the_modified_date('Y-m-d') ?>"><?php the_modified_date('Y/m/d') ?></time>)
                    </div>
                    <h1 itemprop="headline"><?php the_title(); ?></h1>
                    <?php if (has_post_thumbnail()): ?>
                        <div class="mb-4">
                            <?php the_post_thumbnail('large', array('class' => 'img-fluid mx-auto d-block')); ?>
                        </div>
                    <?php endif; ?>

                    <?php the_content(); ?>

                    <?php if (get_the_tags() != ""): ?>
                        <footer class="my-4">
                            <div class="card">
                                <div class="card-body">
                                    <div class="card-title">
                                        <i class="fas fa-search"></i> 関連キーワードから探す
                                    </div>
                                    <div class="singleTag">
                                        <?php the_tags('', ' ', ''); ?>
                                    </div>
                                </div>
                            </div>
                        </footer>
                    <?php endif; ?>


                    <?php comments_template('', true); ?>

                <?php endwhile; else: ?>
                    <p>お探しの記事は見つかりませんでした。</p>
                    <p>またはこれから投稿される予定になっている記事です。公開までしばらくお待ちください。</p>

                <?php endif; ?>
            </div>
        </div>
        <div class="col-md-4 mb-4 articleSide" itemscope="itemscope" itemtype="http://schema.org/WPSideBar">
            <div class="singleRight">
                <?php get_sidebar(); ?>
            </div>
        </div>
    </div>
</div>
<?php get_footer(); ?>
これはsingle.php 内のコードです。
※この記事用のコードになります。
 どのコードを使ってもコピーしても良いです。
このWordPressのシングル( single.php )をコピーしてみましょう。
WordPressのsingle.phpを複製するときの名前通
通常はこのように
single.php
ですね。このシングルを次のような名前にします。
- カテゴリースラッグと同じ名前
例えば
- カテゴリー名がワードプレス
- スラッグ名(URLに該当する部分)がwordpress
としますと
- single-wordpress.php
このようsingle.phpを複製してファイル名single-wordpress.phpにします。
WordPressの詳細ページsingleをカテゴリー別に分岐させる
先ほどコピーした内容はこうですね。
コピーして作成したコードに分かりやすく文章を追加しておきましょう。
<?php get_header(); ?>
<div id="single" class="container my-5">

これは複製した詳細ページです。
カテゴリーのスラッグがwordpressだったらこの詳細ページを表示させます。

    <div class="row">
        <div class="col-md-8 mb-4 articleMain" itemscope="itemscope" itemtype="http://schema.org/BlogPosting"
             itemprop="blogPost">
            <div class="singleLeft" itemprop="articleBody">
                <?php if (have_posts()) : while (have_posts()) : the_post(); ?>
                    <div class="text-right smallEX">
                        <i class="fa fa-calendar"></i>[掲載日]
                        <time itemprop="datePublished" datetime="<?php the_time('Y-m-d') ?>"><?php the_time('Y/m/d') ?></time>
                        (更新日<time itemprop="dateModified" datetime="<?php the_modified_date('Y-m-d') ?>"><?php the_modified_date('Y/m/d') ?></time>)
                    </div>
                    <h1 itemprop="headline"><?php the_title(); ?></h1>
                    <?php if (has_post_thumbnail()): ?>
                        <div class="mb-4">
                            <?php the_post_thumbnail('large', array('class' => 'img-fluid mx-auto d-block')); ?>
                        </div>
                    <?php endif; ?>

                    <?php the_content(); ?>

                    <?php if (get_the_tags() != ""): ?>
                        <footer class="my-4">
                            <div class="card">
                                <div class="card-body">
                                    <div class="card-title">
                                        <i class="fas fa-search"></i> 関連キーワードから探す
                                    </div>
                                    <div class="singleTag">
                                        <?php the_tags('', ' ', ''); ?>
                                    </div>
                                </div>
                            </div>
                        </footer>
                    <?php endif; ?>


                    <?php comments_template('', true); ?>

                <?php endwhile; else: ?>
                    <p>お探しの記事は見つかりませんでした。</p>
                    <p>またはこれから投稿される予定になっている記事です。公開までしばらくお待ちください。</p>

                <?php endif; ?>
            </div>
        </div>
        <div class="col-md-4 mb-4 articleSide" itemscope="itemscope" itemtype="http://schema.org/WPSideBar">
            <div class="singleRight">
                <?php get_sidebar(); ?>
            </div>
        </div>
    </div>
</div>
<?php get_footer(); ?>
このように分かりやすく文章を追加しておきましょう。
これを元に
- カテゴリーがワードプレス(wordpress)だったらこのシングルページを使うと呪文を書きます
元の詳細ページsingle.phpに分岐を書き足す
追加するコードはこんな感じです
	            <?php if (in_category('wordpress')): ?>
                    これはカテゴリースラッグ名がwordPressとした場合に自動的に分岐される
		            <?php get_template_part('single','wordpress'); ?>
	            <?php else:?>
                    wordpressのカテゴリー以外
	            <?php endif;?>
シングルページに分岐条件を記入すると
<?php if (in_category('wordpress')): ?>
	<?php get_template_part('single','wordpress'); ?>
<?php else:?>
<?php get_header(); ?>
<div id="single" class="container my-5"<?php if (!is_user_logged_in()) : ?><?php if( !in_category(array('wordpress','ruby'))) : ?> onMouseDown="return false;" onSelectStart="return false;" onCopy="return false;" unselectable="on"<?php endif; ?><?php endif; ?>>
    WordPress以外のページ
    <div class="row">
        <div class="col-md-8 mb-4 articleMain" itemscope="itemscope" itemtype="http://schema.org/BlogPosting"
             itemprop="blogPost">
            <div class="singleLeft" itemprop="articleBody">
                <?php if (have_posts()) : while (have_posts()) : the_post(); ?>
                    <div class="text-right smallEX">
                        <i class="fa fa-calendar"></i>[掲載日]
                        <time itemprop="datePublished" datetime="<?php the_time('Y-m-d') ?>"><?php the_time('Y/m/d') ?></time>
                        (更新日<time itemprop="dateModified" datetime="<?php the_modified_date('Y-m-d') ?>"><?php the_modified_date('Y/m/d') ?></time>)
                    </div>
                    <h1 itemprop="headline"><?php the_title(); ?></h1>
                    <?php if (has_post_thumbnail()): ?>
                        <div class="mb-4">
                            <?php the_post_thumbnail('large', array('class' => 'img-fluid mx-auto d-block')); ?>
                        </div>
                    <?php endif; ?>
                    <?php the_content(); ?>

                    <?php if (get_the_tags() != ""): ?>
                        <footer class="my-4">
                            <div class="card">
                                <div class="card-body">
                                    <div class="card-title">
                                        <i class="fas fa-search"></i> 関連キーワードから探す
                                    </div>
                                    <div class="singleTag">
                                        <?php the_tags('', ' ', ''); ?>
                                        <?php //the_category(' '); ?>
                                    </div>
                                </div>
                            </div>
                        </footer>
                    <?php else: ?>
                    <?php endif; ?>

                    <?php comments_template('', true); ?>

                <?php endwhile; else: ?>
                    <p>お探しの記事は見つかりませんでした。</p>
                    <p>またはこれから投稿される予定になっている記事です。公開までしばらくお待ちください。</p>
                <?php endif; ?>
            </div>
        </div>
        <div class="col-md-4 mb-4 articleSide" itemscope="itemscope" itemtype="http://schema.org/WPSideBar">
            <div class="singleRight">
                <?php get_sidebar(); ?>
            </div>
        </div>
    </div>
</div>
<?php get_footer(); ?>
<?php endif;?>
このように大きく分けます。
ちょっと長いのでわかりにくいかも知れませんが、上からよくコードを確認してください。
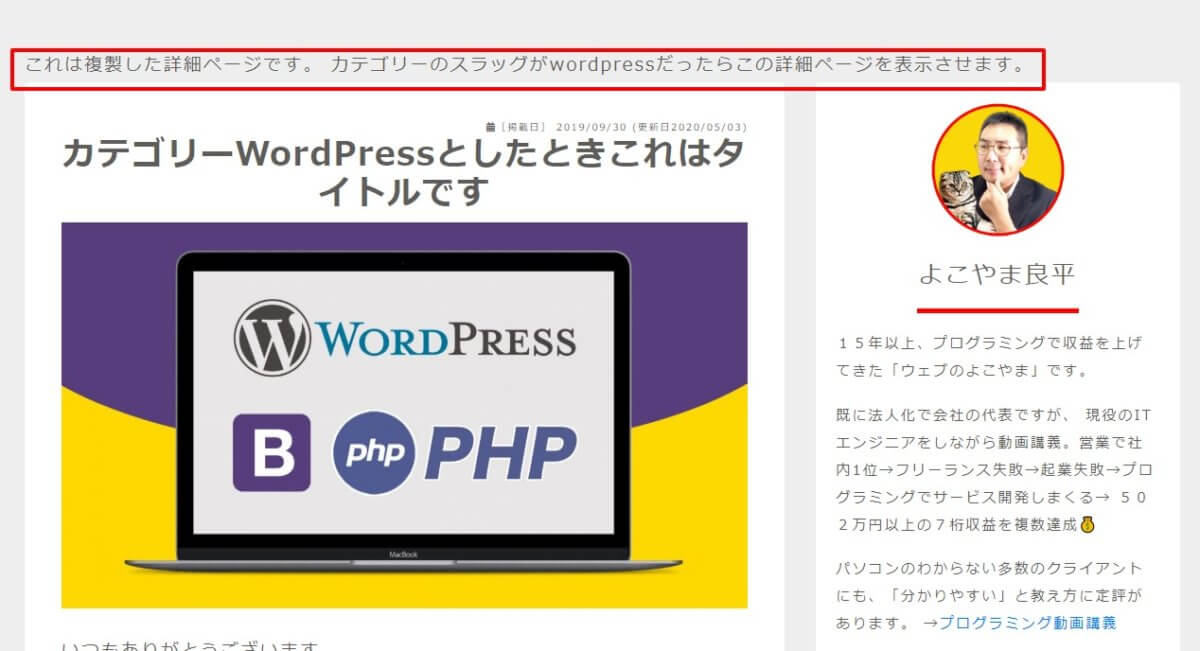
WordPressの詳細ページを分岐させた結果は

カテゴリーがWordPressだった場合は、上部に
これは複製した詳細ページです。
カテゴリーのスラッグがwordpressだったらこの詳細ページを表示させます。
この文章が入るはずです。
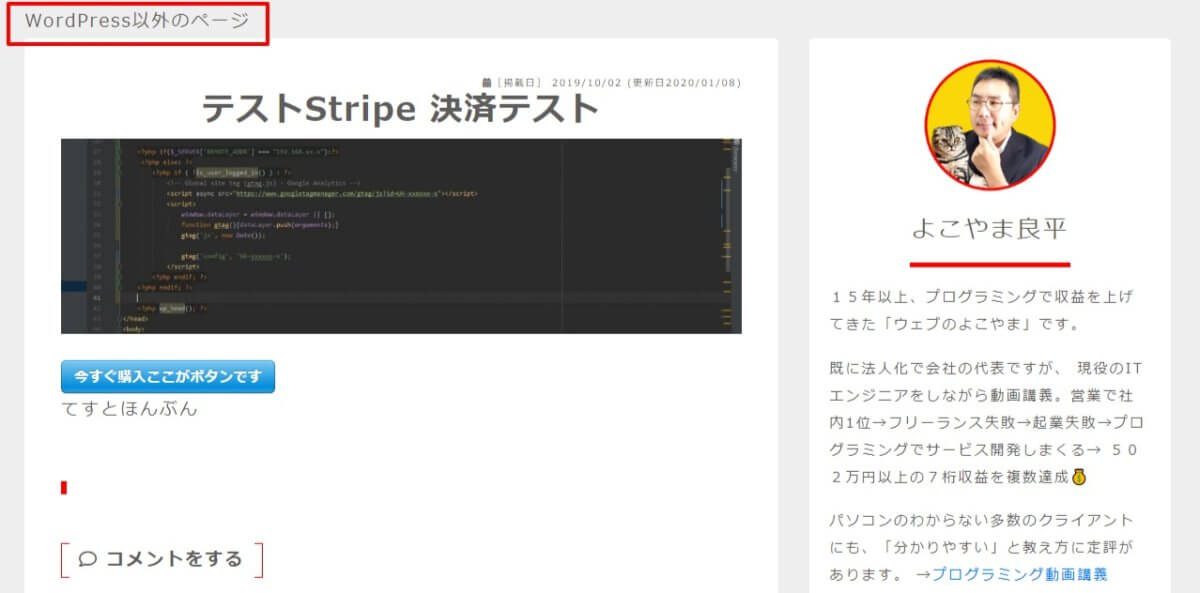
逆にカテゴリーのスラッグ名がwordPress以外だったら

WordPress以外のページ
といった文章が入ったはずです。
確認出来たでしょうか?
これでシングルの分岐は以上です。簡単でしたね。
- テーマごとでなくても部分的に切り替えることも出来ますので試してみてください。
他にもWordPressには分岐する方法は沢山あります。
番外編WordPressの分岐条件の基本
<?php if (条件) : ?>
  条件に合致する場合に表示させたいとき
<?php else: ?>
  条件に合致しない場合に表示させたいとき
<?php endif; ?>
よくあるWordPressの分岐方法は
<?php if ( is_home() || is_front_page() ) : ?>
  ホームページ(またはフロントページ)で表示させる場合はこの中に記載
<?php else: ?>
  それ以外のページで表示する場合はこの中に記載
<?php endif; ?>
このように書けば
- ホームページにはTOP画像を表示させるけど
- ホームページ以外ではTOP画像を表示させない
こういった使い方も出来ますので学習していきましょう。


